Upload Overview
- Use the upload tool supplied by XNAT, OR upload in your web browser using the alternative method.
- Go to prearchive, and review.
- Ensure subject name and session name are correct (and the same).
- Submit to the archive.
- If required, create an appropriate resources folder to contain non-DICOM data, and upload that data seperately
Upload Using Tool
Install upload assisstant 1.6.5 for your operating system:
The XNAT upload tool will walk you through uploading your dicoms to our XNAT server step-by-step. It does not work with .zip archives, and can only work on the folders themselves. So you might need to unzip your archive on your computer before attempting to upload.
The tool will ask for your XNAT login and password, and then for the location of the folder you wish to upload. If you are trying to upload a bunch of difference scans, you can just select the top folder containing all of the data. The tool will figure out the exact structure of your DICOMs.
To ensure you are uploading the correct data, you will need to input the scan date, so make sure you have that on hand. If you annonymized the data by overwriting the scan date, you will need to input the new value you used (e.g., Jan 1st 1900).
This tool will allow you to select scans to include / exclude from your upload. Feel free to uncheck ‘extra’ files not required by the scanning protocol. For example, FA maps generated by the MRI, ‘screen_saves’, and other misc files not explicitly defined in the scanning protocol.
Finally, upload the data. It is a good idea to visit the prearchive / the archive to make sure all of your data arrived in the database safely (see below).
Uploading Using Web Browser
To upload your DICOM data to our XNAT server, you first want to put all of the relevant DICOM folders for a single subject’s session in a .zip file. Then, from the home page’s top bar, select upload, then images.

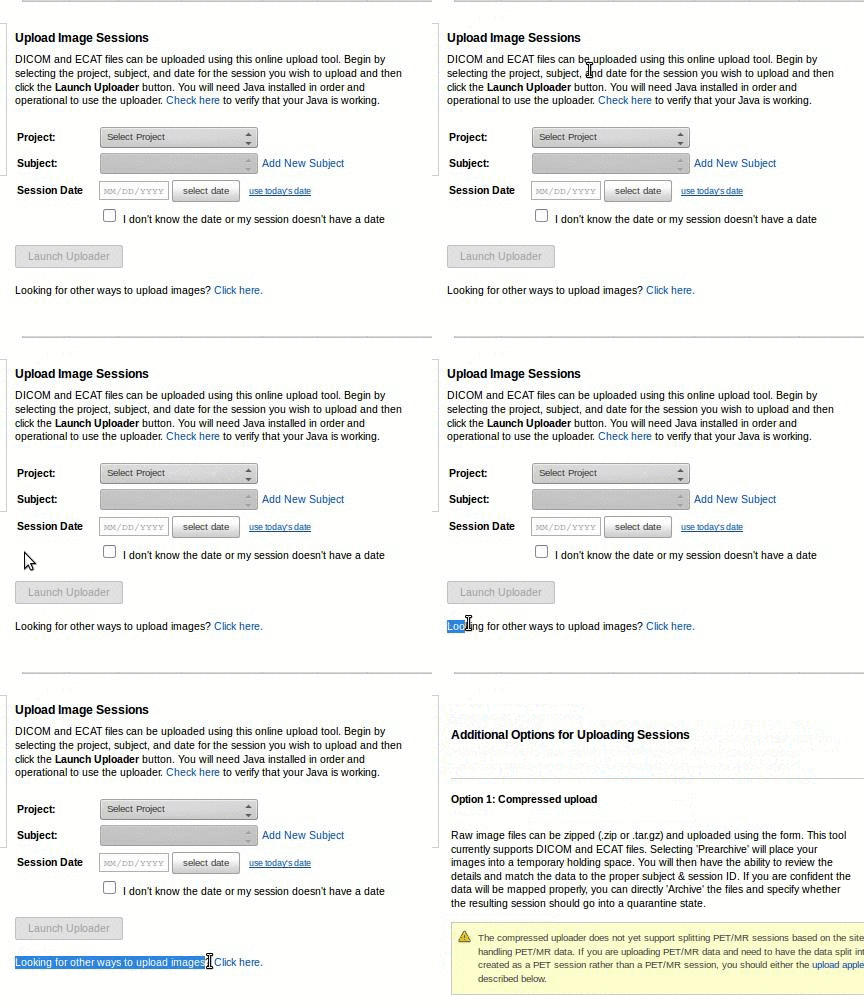
From the upload image sessions page, we want to select the alternative upload method. We find this works better with a wide variety of systems. The link to the alternative upload system is hidden at the bottom;

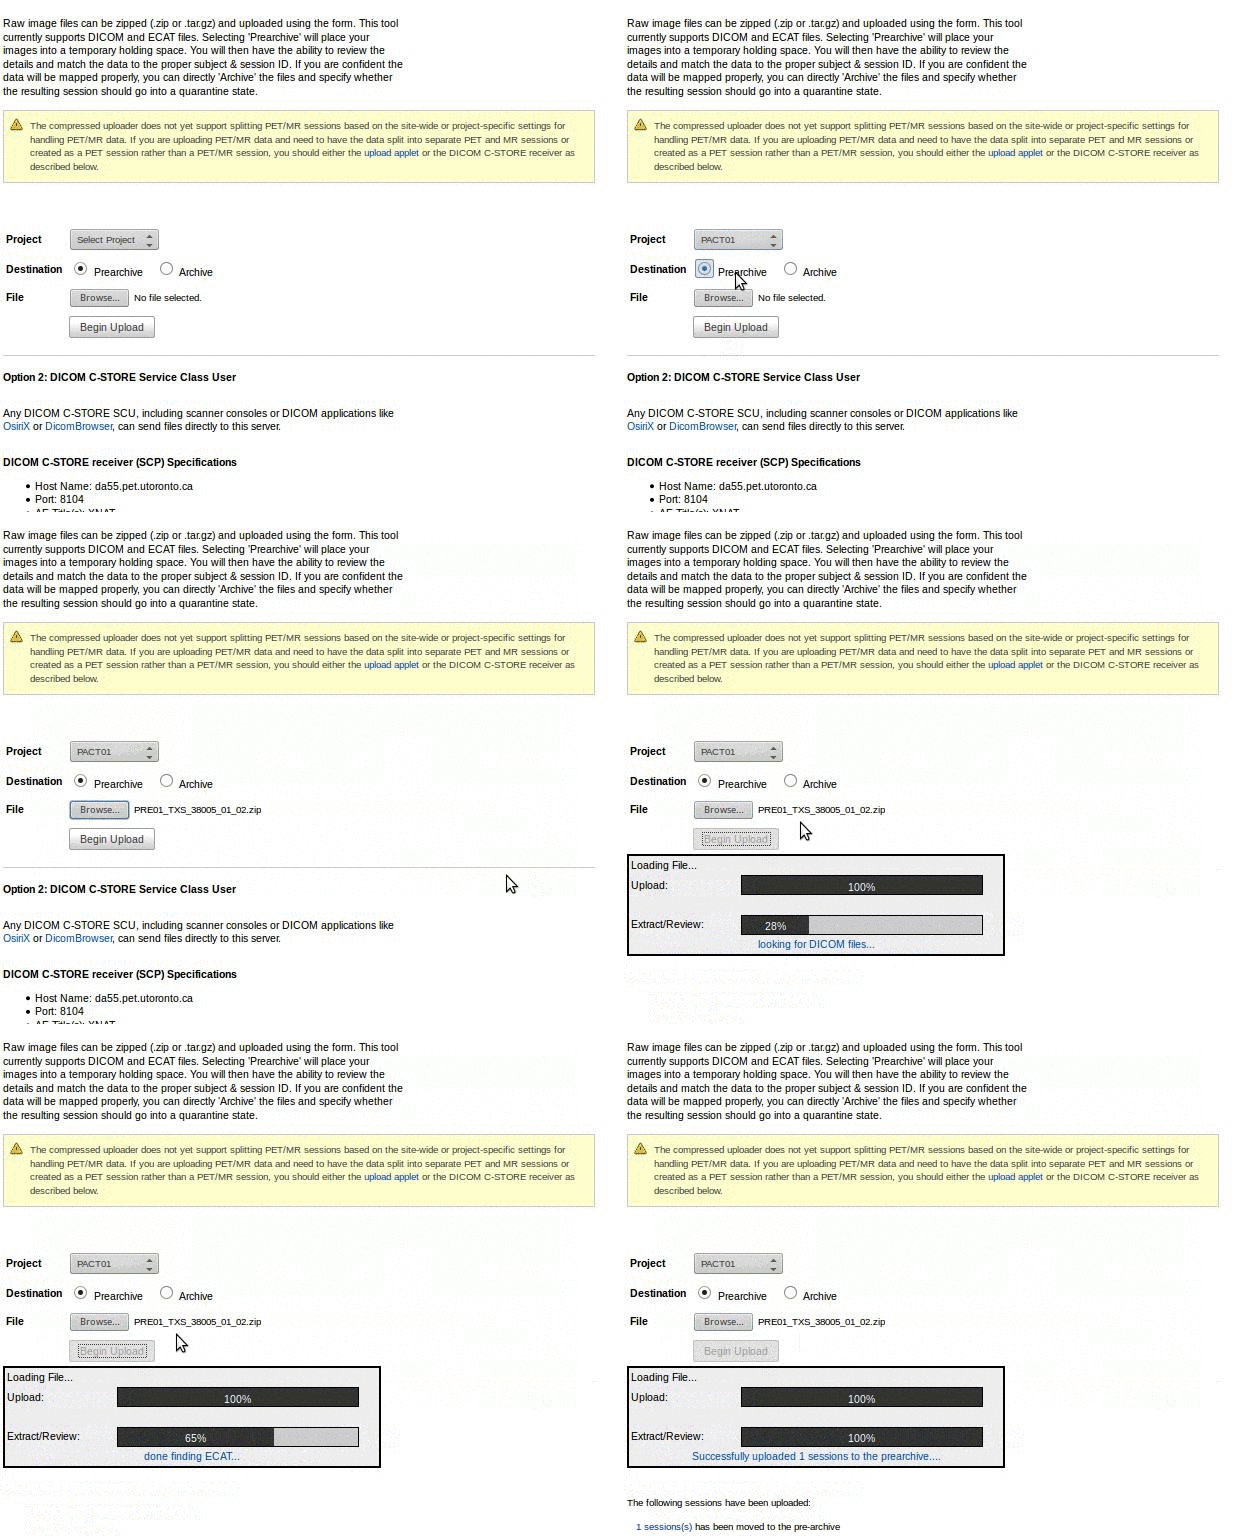
On this page, we want to select what project we are uploading the data to, set the destination to prearchive, and select the zip file containing the DICOMs. Please be patient at this stage, as the upload can take some time.

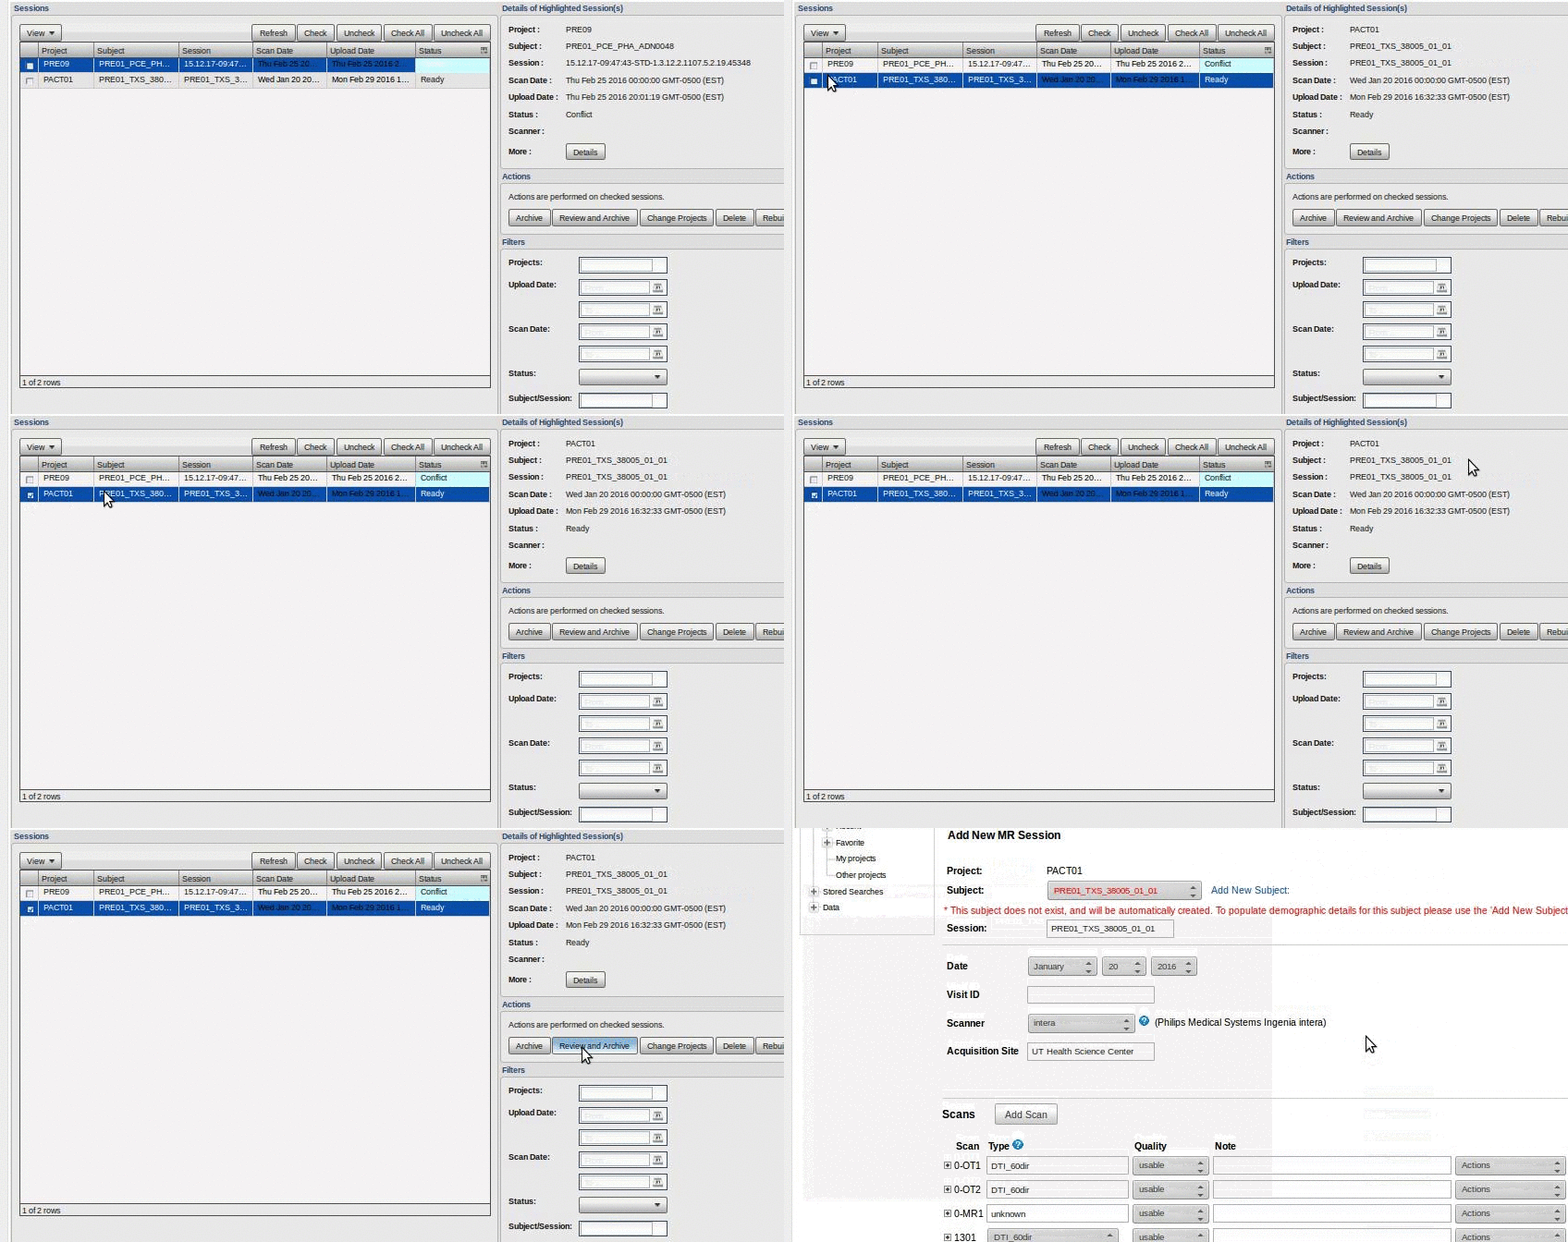
Now, we need to make sure the metadata for the upload is set correctly (particularly the subject and session names). These should be automatically generated correctly from the DICOM headers, but if a mistake is made at the scanner, you can correct it in XNAT. This is done from the prearchive. From the top bar, select upload, then go to prearchive.

This screen contains all pending scans. The metadata for this upload is visible in the top right hand corner. Any data here is NOT accessible from the main database and will not be analyzed by us. You must make sure this data is reviewed and archived so that it can be properly analyzed, by simply selecting a series and clicking review and archive:

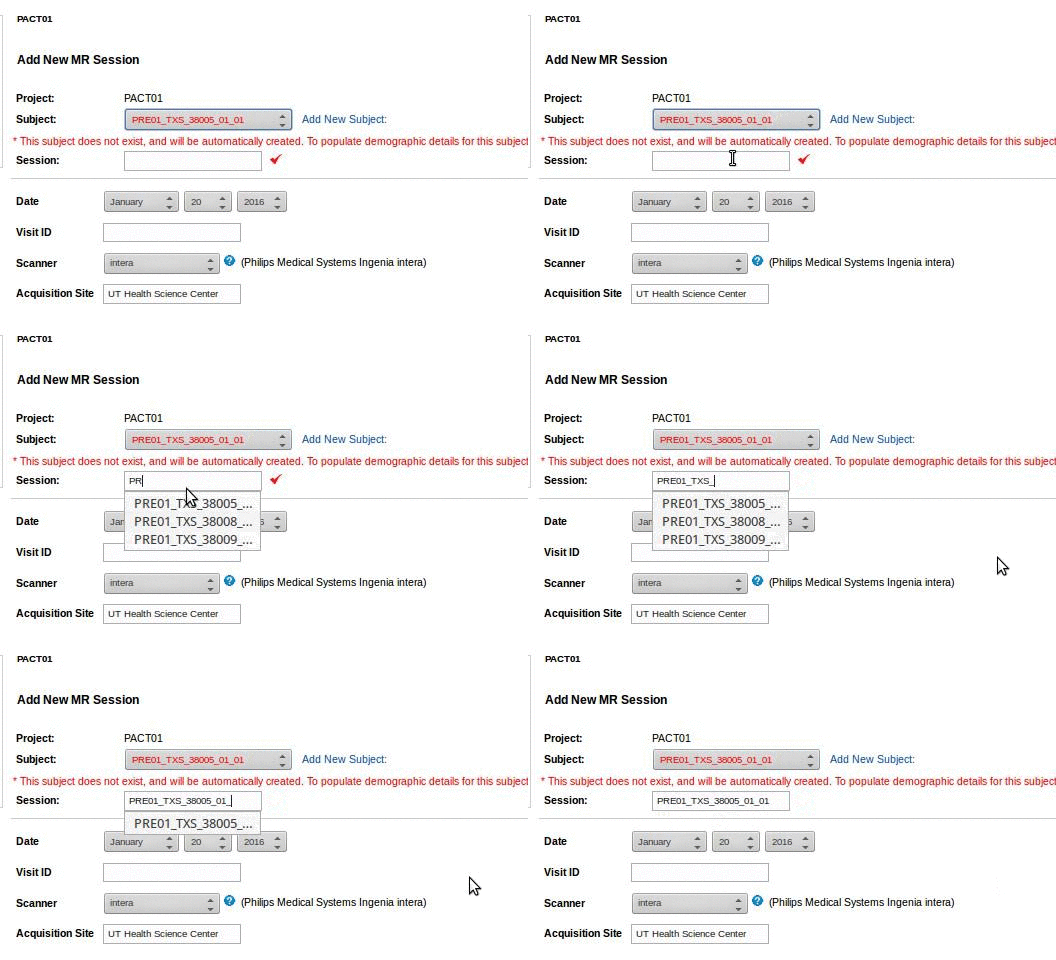
Recall that, in our database, the subject and session name must match exactly and should follow our naming convention. You can do that here by either adding a new subject (if need be), adding / editing the session.
You can also edit other metadata such as date of birth, gender, or handedness (if required).

Finally, at the bottom, select submit. Your data should now be available in the archive and appear on the main page under ‘recent data activity’.
Uploading Non-DICOM Data
If collected, extra datatypes (e.g., physiological or behavioural) data collected during the MRI scans need to be uploaded separately. Non-image uploads could also be technologist notes or QC .pdf files. These must be added to a subject’s session, which should be done after the DICOM files have been uploaded.
XNAT keeps the data organized under each subject’s session in resources/ and scans/. The scans/ folder holds all of the uploaded DICOM data, and the resources/ folder contains everything else. Therefore, under resources, you can create folders as nessicary:
resources/logs– participant log sheets (.xls, .csv, .pdf, etc.)resources/behav– behavioural data for fMRI experiments.resources/physio– physiological recordings collected during the MRI protocol.
To upload data to one of these folders:
- From the subject page, click on the session.
- Click ‘Manage Files’ on the right hand bar. You should see a list of the DICOM scans under scans/ and a resources/ folder (potentially with some contents).
- To create a folder: Click
Add Folder. SetLeveltoresourcesand set a name forfolder. ClickCreate. - To upload data to this folder: Click
Upload Files,Levelshould beresources, andFoldershould be the desired folder. Click ‘Browse’ and attach the.zipfile. ClickUpload. - Click ‘extract files to server’.
Uploading using direct DICOM transfer
If your MR unit is set up to send data directly from the scanner over the Internet, you may try sending us your data via this method using the following:
- XNAT Address: da55.pet.utoronto.ca
- DICOM Port: 8104.
- Calling & Called Title: XNAT
If you opt to use this method, please do a test push of your data so we can ensure there are no issues receiving your participant data!
Upload Rules
- Ensure your raw DICOM scans for a given participant are in each in their own folder.
- Do not include NIFTI or otherwise converted files in this package.
- Do not include any pre-processed data from the scanner (e.g., motion corrected data, FA maps, etc.) These pollute the database and we can generate better images in post-processing.
